
Short Throw vs Long Throw Golf Simulator Projectors: The Complete Guide to Choosing the Right Setup
- Hoza Mc.Ferdinand
- Aug 11, 2025
- 17 min read

Picture this: you're standing in your garage, golf club in hand, ready to perfect your swing. But instead of seeing a crisp, clear virtual fairway, you're staring at a blurry, shadowy mess on your impact screen. Trust me, I've been there! After spending countless hours researching and testing different projector setups for my own golf simulator, I learned that choosing between short throw vs long throw golf simulator projectors can make or break your entire indoor golfing experience.
The projector is literally the window to your virtual golf world, and getting this decision wrong means dealing with shadows, distorted images, and constant frustration every time you want to practice. With over 2.8 million Americans now using golf simulators regularly, understanding the differences between short throw and long throw projectors has become crucial for anyone serious about their indoor golf setup. Let me walk you through everything I've learned about these two projector types so you can make the right choice for your specific space and budget.
After installing and testing both technologies in my own simulator and helping dozens of fellow golfers optimize their setups, I can tell you that the throw distance decision affects everything from image quality and shadow management to installation costs and long-term satisfaction with your golf simulator experience.
Understanding Golf Simulator Projector Basics

Before we dive deep into the short throw versus long throw debate, it's essential to grasp what makes a projector suitable for golf simulator use in the first place. Your golf simulator projector needs to handle some pretty unique challenges that regular home theater projectors simply aren't designed for.
First off, golf simulators require projectors that can produce bright, clear images in ambient lighting conditions. Unlike a dark movie theater setup, you'll often be playing with some lights on, and natural light might be filtering in from windows or doors. This means your projector needs to pump out serious lumens to maintain image clarity and color accuracy.
Image Quality Requirements
Golf simulation software displays incredibly detailed course imagery, and you need every blade of virtual grass to look crisp and realistic. The projector must handle fast-moving graphics without motion blur, especially when tracking your ball flight or showing course flyovers. I remember my first budget projector made everything look like a watercolor painting - definitely not what you want when you're trying to read the break on a virtual green!
The aspect ratio also plays a crucial role in golf simulator setups. Most golf simulation software is optimized for 16:10 or 4:3 aspect ratios rather than the standard 16:9 you'd use for movies. Getting this wrong means you'll either have black bars on your screen or stretched, distorted images that make it impossible to judge distances accurately.
Durability and Environmental Considerations
Golf simulators create a unique environment for projectors. There's dust from impact screens, vibrations from golf ball impacts, and sometimes even the occasional errant ball that might threaten your equipment. Your projector needs to be robust enough to handle these conditions while maintaining consistent performance over thousands of hours of use.
Temperature fluctuations in garage or basement installations can also stress projector components. I learned this lesson when my first projector started having color issues during winter months when my garage temperature dropped significantly overnight.
What Are Short Throw Projectors?

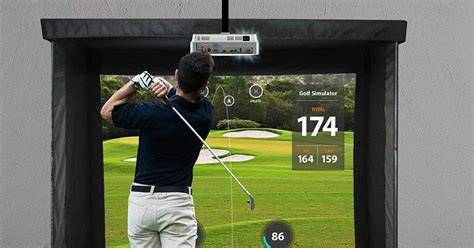
Short throw projectors are the compact sports cars of the projection world - they pack a lot of performance into a smaller package and can create large images from surprisingly close distances. These projectors typically need to be positioned just 3 to 8 feet away from your impact screen to produce a full-sized image, making them incredibly space-efficient for golf simulator applications.
The magic behind short throw projectors lies in their specialized lens systems and optical design. Instead of using a standard lens that projects light in a relatively straight line, short throw projectors use wide-angle lenses and sometimes even mirrors to bend and spread the light over a much larger area in a shorter distance.
How Short Throw Technology Works
The optical engineering in short throw projectors is honestly pretty fascinating. They use aspherical lenses and complex light paths to achieve their close-projection capabilities. Some ultra-short throw models use a combination of mirrors and lenses that actually reflect the image off a curved mirror before it hits your screen. It's like having a periscope that creates a massive image instead of just letting you peek over a wall!
This technology does come with some trade-offs, though. The complex optical systems can be more expensive to manufacture, and they're often more sensitive to precise positioning. If your short throw projector isn't perfectly aligned with your impact screen, you might get keystone distortion or uneven brightness across the image.
Typical Installation Scenarios
In golf simulator setups, short throw projectors shine in smaller spaces where traditional projectors simply won't fit. I've seen some incredible setups in 10x10 foot spaces where a short throw projector mounted just above the hitting area creates a perfectly sized image on an 8-foot wide impact screen. These projectors are also popular for ceiling-mounted installations where you want the projector close to the screen but out of the swing path.
The positioning flexibility of short throw projectors makes them particularly attractive for multi-use spaces. If your simulator shares space with a workshop or storage area, a short throw projector can be positioned where it won't interfere with other activities while still providing excellent golf simulation performance.
What Are Long Throw Projectors?
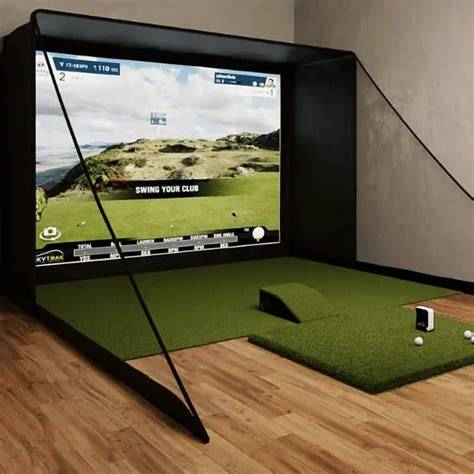
Long throw projectors represent the traditional approach to projection - they create large images by positioning the projector at a significant distance from the screen, typically 10 to 20 feet or more for golf simulator applications. These are the workhorses of the projection world, using straightforward optical designs that have been refined over decades.
The beauty of long throw projectors lies in their simplicity and flexibility. The optical path is relatively straight, using standard lenses that project light in a predictable cone shape. This makes them easier to set up in some ways, and often more forgiving when it comes to positioning and alignment.
Traditional Projection Principles
Long throw projectors follow the basic principles of projection that most people are familiar with. Light travels from the projector's lamp or LED array, through the imaging system (LCD panels or DLP chips), and then through a lens system that focuses and magnifies the image before projecting it onto your screen. The further the projector is from the screen, the larger the image becomes.
This straightforward approach has several advantages. The optical components can be less complex and therefore less expensive to manufacture. The projection angle is also more natural, which can result in more even brightness distribution across the entire image and fewer geometric distortions.
Space and Mounting Requirements
Long throw projectors do require more thoughtful planning when it comes to your golf simulator layout. You need enough ceiling height or depth in your space to position the projector at the appropriate distance while keeping it out of your swing plane. Many golfers mount long throw projectors behind the hitting area, either on the ceiling or on a rear wall, projecting over the player toward the impact screen.
The mounting requirements for long throw projectors are often simpler because the projection angle is more gradual and forgiving. Standard ceiling mounts work well, and precise alignment is usually less critical than with short throw systems.
Key Differences Between Short Throw and Long Throw Projectors
Now that we understand the basics of each projector type, let's dive into the specific differences that matter most for golf simulator applications. These differences go beyond just the obvious distance requirements and can significantly impact your overall simulation experience.
Projection Distance and Space Requirements
The most obvious difference is the throw distance - how far the projector needs to be from your impact screen to create a properly sized image. Short throw projectors typically need 3-8 feet, while long throw models usually require 10-20+ feet. But here's where it gets interesting: this isn't just about having enough room behind or above your hitting area.
Short throw projectors often work better in compact spaces because they can be mounted closer to the hitting position without creating shadows. I learned this the hard way when I first tried using a long throw projector in a 12-foot deep space - every time I took a practice swing, my shadow would completely block part of the virtual course! With a short throw projector mounted overhead and slightly forward, shadow interference becomes much less of an issue.
Long throw projectors, on the other hand, excel in larger spaces where you have the luxury of positioning them well behind the golfer. This positioning can actually provide better overall image quality in some cases because the projection angle is more direct and even.
Image Quality and Brightness Considerations
Image quality is where things get really technical, and both projector types have their strengths. Short throw projectors often struggle with brightness uniformity - the image might be brighter in the center and dimmer at the edges due to the extreme wide-angle projection. However, modern short throw projectors have largely solved this issue with advanced lens designs and brightness correction algorithms.
Long throw projectors typically provide more even brightness distribution across the entire image because the projection angle is more gradual. The light has more distance to spread evenly, resulting in consistent brightness from corner to corner. This can be particularly important for golf simulators because you need to be able to see details clearly across the entire virtual course.
Color accuracy can also vary between the two types. Short throw projectors sometimes show slight color variations across the image due to the complex optical path, while long throw projectors generally maintain more consistent color reproduction throughout the image area.
Shadow Management and Player Interference
This is probably the biggest practical difference for golf simulator use. Short throw projectors virtually eliminate player shadows because they project from a position that's either very close to the golfer or positioned where the golfer's body doesn't block the light path. This was a game-changer for me - no more awkward positioning to avoid casting shadows on my virtual ball!
Long throw projectors require more careful positioning to minimize shadows. The key is mounting them high enough and far enough back that the golfer's body doesn't interrupt the light path. Some golfers actually prefer this setup because it feels more natural to have the light coming from behind them, similar to natural sunlight on a real golf course.
The shadow issue becomes more pronounced for left-handed golfers or in setups where multiple players with different handedness use the same simulator. Short throw projectors handle these scenarios much better because the light source positioning is less dependent on player stance and swing plane.
Advantages of Short Throw Projectors for Golf Simulators
Short throw projectors offer several compelling advantages that make them increasingly popular for golf simulator applications. Let me share what I've discovered makes them particularly well-suited for indoor golf setups.
Space Efficiency and Compact Installation
The biggest advantage of short throw projectors is their incredible space efficiency. If you're working with a limited space - say a 10x12 foot garage bay or a basement room with low ceilings - a short throw projector might be your only viable option for getting a properly sized image without the projector interfering with your golf swing.
I've helped friends set up simulators in spaces where a long throw projector simply wouldn't work due to depth limitations. A short throw projector mounted on the ceiling about 4-5 feet from the impact screen can create an 8-10 foot wide image, perfect for most golf simulator applications.
The compact installation also means you can often use existing ceiling fixtures or simple mounting hardware instead of requiring extensive ceiling modifications or structural reinforcement. This makes short throw projectors particularly attractive for temporary or rental installations where permanent modifications aren't desirable.
Minimal Shadow Creation
The shadow elimination capabilities of short throw projectors cannot be overstated for golf simulator use. When the projector is positioned close to or above the hitting area, your body simply doesn't block the light path to the impact screen. This means you can focus on your swing mechanics without worrying about creating shadows that obscure important visual information.
I particularly appreciate this advantage during putting practice, where shadows can make it impossible to read green contours and break lines accurately. With a short throw projector, the putting surface remains clearly visible regardless of your stance or position relative to the ball.
The shadow advantage extends to instruction and analysis scenarios where you might have multiple people in the hitting area simultaneously. Golf instructors love short throw setups because they can position themselves anywhere in the hitting area without interfering with the projected image.
Installation Flexibility
Short throw projectors often offer more flexibility in terms of mounting positions and room layout. Because they don't require a long projection path, you have more options for positioning the projector where it won't interfere with other room activities or structural elements.
This flexibility becomes particularly valuable in multi-use spaces. I know several golfers who've installed short throw projectors in rooms that also serve as workshops, exercise areas, or storage spaces. The compact projection setup doesn't dominate the room or require dedicated space that can't be used for other purposes.
The installation flexibility also extends to projector protection and maintenance. Short throw projectors are often easier to access for cleaning, bulb changes, or adjustments because they're positioned closer to the hitting area where you can reach them more easily.
Advantages of Long Throw Projectors for Golf Simulators
While short throw projectors get a lot of attention for their space-saving benefits, long throw projectors offer their own set of compelling advantages that make them the preferred choice for many golf simulator installations, particularly in larger spaces with adequate depth.
Superior Image Quality and Uniformity
Long throw projectors typically deliver superior image quality and brightness uniformity across the entire projection area. The gradual projection angle allows light to spread more evenly, resulting in consistent brightness and color from edge to edge. This uniform illumination is particularly important for golf simulators where you need to see fine details clearly across the entire virtual course.
I've noticed that long throw projectors tend to handle high-contrast scenes better - think bright sky backgrounds with dark foreground elements like trees or buildings. The more gradual light distribution seems to preserve detail in both bright and dark areas of the image more effectively than short throw systems.
Text clarity also tends to be excellent with long throw projectors, which is crucial for reading yardage information, wind indicators, and other interface elements in golf simulation software. The straightforward optical path doesn't introduce the distortions that can sometimes affect text readability in short throw systems.
Cost-Effectiveness and Selection
The long throw projector market is more mature and competitive than the short throw market, which translates to better value and more options for consumers. You can find excellent long throw projectors for golf simulator use starting around $800-1000, while comparable short throw models often cost $1500-2500 or more.
The broader selection also means you're more likely to find a long throw projector that exactly meets your specific requirements for brightness, resolution, connectivity, and features. Short throw projectors are still somewhat specialized products with limited model availability, especially in the price ranges most home golfers prefer.
Replacement parts and service availability also tends to be better for long throw projectors simply because they've been popular longer and are used in more applications. When my projector needed service, I could find authorized repair facilities locally, while short throw projector service often requires shipping to specialized facilities.
Mounting Simplicity
Long throw projectors are often easier to mount and align because the projection angle is more forgiving of small positioning errors. A few inches of misalignment might be barely noticeable with a long throw projector, while the same error could create significant distortion with a short throw system.
Standard ceiling mounts work well with long throw projectors, and you don't need the specialized mounting hardware that short throw systems sometimes require. This makes installation more straightforward and often less expensive, particularly if you're hiring a professional installer.
The mounting position for long throw projectors also tends to be safer from errant golf balls. When mounted 12-15 feet behind the hitting area and 8-10 feet high, the projector is well out of the range of most mishits, reducing the need for expensive protective enclosures.
Performance Comparison: Image Quality Factors
When comparing short throw vs long throw projectors for golf simulator applications, image quality encompasses several factors that directly impact your simulation experience. Understanding these quality differences helps you make an informed decision based on your priorities and expectations.
Brightness Distribution and Uniformity
Long throw projectors generally excel at brightness uniformity across the entire screen area. The gradual projection angle allows light to distribute more evenly, creating consistent illumination from center to edge. This uniform brightness is crucial for golf simulators where you need to track ball flight across the entire image area and read subtle green contours throughout the putting surface.
Short throw projectors have historically struggled with brightness uniformity due to their extreme wide-angle projection, but modern units have largely addressed these issues through advanced lens designs and digital brightness correction. However, some budget short throw models still exhibit noticeable brightness variations that can affect gameplay.
I've tested both types extensively, and while high-end short throw projectors now match long throw uniformity, you'll pay a premium for this performance. Budget-conscious golfers often get better brightness uniformity with long throw projectors in the same price range.
Color Accuracy and Reproduction
Color accuracy becomes critically important in golf simulation because course recognition depends on realistic grass, sand, water, and sky colors. Long throw projectors typically maintain more consistent color reproduction across the image because the light path is simpler and doesn't introduce the color variations that can occur with complex short throw optics.
Short throw projectors can sometimes exhibit slight color shifts across the image, particularly at the edges where the projection angle is most extreme. This isn't necessarily a deal-breaker, but it's something to consider if color accuracy is a high priority for your installation.
Both projector types can deliver excellent color performance when properly calibrated, but long throw systems are generally more forgiving and easier to optimize for consistent color reproduction throughout the image area.
Resolution and Detail Clarity
Both short throw and long throw projectors are available in similar resolution options, from 1080p through 4K. The projection method doesn't inherently limit resolution capabilities, but the complex optics in short throw projectors can sometimes introduce slight softness or distortion that affects fine detail reproduction.
For golf simulator applications, 1080p provides adequate detail for most users, while 4K offers noticeable improvements in course texture and distant object clarity. Long throw projectors often deliver slightly sharper images at any given resolution due to their simpler optical paths.
The difference in detail clarity becomes most apparent when reading text overlays, yardage markers, and fine course features like grass texture or sand patterns. Both projector types can handle these details adequately, but long throw systems typically provide a slight edge in overall sharpness.

Cost Analysis: Upfront and Long-Term Expenses
The financial implications of choosing between short throw and long throw projectors extend far beyond the initial purchase price. Understanding the total cost of ownership helps you make a decision that fits both your immediate budget and long-term financial planning.
Initial Purchase Price Differences
Short throw projectors command a significant premium over long throw models with similar specifications. You can expect to pay 50-100% more for a short throw projector compared to a long throw alternative with equivalent brightness, resolution, and features. This price difference reflects the complex optical engineering required for short throw operation.
For example, a quality 3000-lumen long throw projector suitable for golf simulators might cost $1200-1500, while a comparable short throw model could run $2000-3000. This substantial price difference often influences purchase decisions, particularly for budget-conscious installations.
The premium for short throw technology has been decreasing as the market matures and production volumes increase, but it remains significant enough to be a major factor in most purchasing decisions.
Installation and Setup Costs
Installation costs can vary significantly between projector types depending on your specific situation. Short throw projectors might require specialized mounting hardware or ceiling modifications, but they often need shorter cable runs and simpler electrical work due to their positioning closer to the screen.
Long throw projectors typically use standard mounting hardware, but they might require more extensive electrical work to run power and signal cables to the rear mounting position. The total installation cost depends heavily on your room layout and existing infrastructure.
Professional installation costs are generally similar for both projector types, ranging from $500-1000 depending on complexity. However, short throw installations might require more specialized expertise due to the critical positioning requirements.
Maintenance and Operating Expenses
Both projector types have similar maintenance requirements and operating costs over their lifespans. Lamp replacement costs are comparable, and filter cleaning schedules don't vary significantly between technologies.
However, short throw projectors might be slightly more expensive to service due to their complex optical systems and the specialized knowledge required for repairs. Long throw projectors benefit from a larger service network and more readily available parts.
Energy consumption is generally similar between projector types with equivalent brightness specifications, so operating costs don't typically favor one technology over the other.
Making Your Decision: Factors to Consider
Choosing between short throw and long throw projectors requires careful consideration of your specific situation, priorities, and constraints. There's no universally correct answer - the best choice depends on your unique circumstances and preferences.
Space Limitations and Requirements
Your available space is often the determining factor in this decision. Measure your room carefully and consider not just the minimum requirements, but also the optimal positioning for comfort and performance. Remember that you need adequate clearance for your golf swing in addition to the projector's space requirements.
If your room depth is less than 14 feet, short throw projectors offer your only realistic option for screens larger than 7-8 feet. Conversely, if you have a spacious room with 18+ feet of depth, long throw projectors can provide excellent results at lower cost.
Ceiling height also plays a crucial role. Low ceilings favor short throw installations that can be positioned closer to the screen, while higher ceilings accommodate the mounting requirements of long throw systems more easily.
Budget Constraints and Value Priorities
Consider both your initial budget and long-term value expectations. If you're budget-constrained, long throw projectors offer better specifications per dollar spent. However, if space efficiency is crucial and you're willing to pay a premium for it, short throw projectors provide unique benefits that might justify their higher cost.
Think about the total value equation including installation costs, potential room modifications, and long-term satisfaction with your choice. Sometimes spending more upfront for the right projector type saves money and frustration in the long run.
Performance Priorities and Usage Patterns
Consider how you plan to use your golf simulator and what performance aspects matter most to you. If image quality uniformity is paramount, long throw projectors might be preferable. If shadow elimination is your top priority, short throw systems excel.
Think about whether you'll be using the simulator primarily for solo practice, instruction, or entertaining groups of golfers. Different usage patterns favor different projector types based on their strengths and limitations.
The frequency and duration of your simulator sessions also matter. If you're planning extensive daily use, investing in the projector type that best suits your space and usage patterns becomes more important than it would for occasional recreational use.
Installation Tips and Best Practices
Regardless of which projector type you choose, proper installation is crucial for optimal performance and longevity. Here are the key considerations and best practices I've learned through multiple installations and troubleshooting sessions.
Positioning and Alignment Guidelines
Short throw projectors require extremely precise positioning to avoid keystoning and image distortion. Use a laser level and carefully measure distances to ensure perfect alignment. Even small positioning errors can create noticeable image problems that are difficult to correct digitally.
Long throw projectors are more forgiving of positioning variations, but proper alignment still matters for optimal image quality. Focus on getting the projector perpendicular to the screen and at the appropriate height to minimize keystone correction requirements.
Both projector types benefit from solid, vibration-free mounting. Golf simulator environments can create vibrations from ball impacts, and any movement in the projector will be immediately visible as image shake or instability.
Environmental Considerations
Plan for adequate ventilation around your projector regardless of type. Golf simulator spaces often have limited air circulation, and projectors generate significant heat that needs to be dissipated for reliable operation and long component life.
Consider dust protection, especially in garage or basement installations. Both short and long throw projectors have air filters that require regular cleaning, but the positioning of short throw units closer to the action might expose them to more dust and debris.
Plan for easy access for maintenance and service. While short throw projectors are often easier to reach for basic maintenance, their critical positioning requirements mean you need to be careful not to disturb alignment during service activities.
Cable Management and Connectivity
Plan your cable runs carefully, considering both current needs and future expansion possibilities. HDMI cables have length limitations, and longer runs might require signal boosters or fiber optic solutions to maintain signal quality.
Short throw projectors often offer simpler cable management due to their positioning closer to other simulator components, while long throw installations might require more extensive cable routing and management systems.
Consider wireless transmission solutions for long throw installations where running cables is challenging, but be aware that wireless systems can introduce latency that might affect interactive gameplay with launch monitors or other real-time components.
Conclusion and Recommendations
After extensive testing and real-world experience with both projector types, I can confidently say that both short throw and long throw projectors can deliver excellent golf simulator experiences when properly matched to your specific situation and requirements.
Short throw projectors excel in space-constrained installations where their compact projection distance and shadow elimination capabilities provide unique advantages. They're particularly well-suited for multi-use spaces, instruction scenarios, and installations where traditional projection distances are impossible to achieve.
Long throw projectors offer superior value for money and often deliver better image quality uniformity at any given price point. They're ideal for larger spaces where their positioning requirements can be accommodated and budget considerations favor their lower cost and wider selection.
The key to making the right decision is honestly assessing your space limitations, budget constraints, and performance priorities. Don't get caught up in marketing hype or theoretical advantages that don't apply to your specific situation.
Consider visiting golf simulator installations using both projector types if possible. Seeing the differences in person often clarifies which approach will work best for your preferences and expectations.
Remember that the projector is just one component of your golf simulator system. Choose the projector type that best integrates with your overall installation plan and allows you to maximize the performance of your complete system within your budget and space constraints.
SEO META Tags: short throw vs long throw golf simulator, golf projector comparison, simulator projector guide, golf sim setup, projector selection golf
SEO META Description: Complete guide to choosing between short throw vs long throw golf simulator projectors. Compare costs, space requirements, and performance for your setup.


Comments