
Ultimate Guide to DIY Golf Simulator Enclosures
- Hoza Mc.Ferdinand
- Jul 29, 2025
- 19 min read

Updated: Aug 2, 2025

Three years ago, I thought building a golf simulator enclosure would be as simple as hanging some curtains and calling it a day. After my first attempt collapsed during a particularly enthusiastic driver swing, I realized I had a lot to learn about proper enclosure construction!
Here's a statistic that opened my eyes: The black nylon (and impact screen) in the DIY enclosure attaches to 1-inch EMT. And our Pro and Curved enclosures attach to a 2-inch EMT. The material choice for your frame makes all the difference between a wobbly structure and a professional-grade setup.
Building the right enclosure isn't just about containing golf balls - it's about creating an immersive environment that enhances your entire simulator experience. After multiple builds, material tests, and plenty of trial and error, I've learned what actually works for DIY enthusiasts. This guide covers everything from material selection to professional finishing techniques that'll make your garage setup rival commercial facilities.
Whether you're working with a tiny basement corner or a spacious garage bay, I'll walk you through proven strategies that deliver results without breaking the bank.
Table of Contents
Understanding Golf Simulator Enclosures
When I first started researching golf simulator enclosures, I underestimated their importance in the overall setup. An enclosure isn't just about keeping golf balls contained - though that's certainly critical for safety and equipment protection.
Primary Functions of an Enclosure
A properly designed golf simulator enclosure serves multiple essential purposes. First, it creates ball containment to prevent damage to your space, family members, and expensive equipment like projectors or monitors. Second, it provides a controlled environment for optimal projection quality by eliminating ambient light and creating consistent viewing conditions.
The enclosure also defines your playing space psychologically. A well-built enclosure makes you feel like you're in a dedicated golf facility rather than swinging in your garage. This mental aspect significantly impacts your practice quality and enjoyment.
I learned the hard way that skimping on enclosure design affects everything else. My first makeshift setup with bed sheets and a few poles constantly shifted during swings, creating distractions that hurt my practice sessions.
Essential Design Elements
Every effective golf simulator enclosure includes several key components that work together for optimal performance. The frame structure provides the backbone that supports all other elements and must handle dynamic forces from ball impacts and fabric tension.
The fabric enclosure material determines both the visual quality of your environment and the effectiveness of ball containment. You'll need impact-resistant material for the hitting area and lighter fabric for the sides and ceiling areas that don't receive direct ball contact.
Proper attachment systems connect the fabric to the frame securely while allowing for easy removal and adjustment. This includes everything from bungee cords and clips to more sophisticated tensioning systems for professional-grade installations.
Planning Your Enclosure Design
Proper planning prevents most of the headaches I experienced during my first few builds. You need to consider not just the obvious factors like space dimensions, but also ceiling height, door access, and how you'll integrate other simulator components.
Space Assessment and Requirements
Start by measuring your available space carefully, considering both the minimum requirements and optimal dimensions for comfortable play. Most golf simulator enclosures require at least 10 feet in width, 10 feet in depth, and 9 feet in height, although more space always enhances the experience.
Your specific requirements will vary based on:
Golfer Height - Taller players need more ceiling clearance, especially for driver swings
Swing Characteristics - Wide swings require more side clearance than compact swings
Left vs Right-Handed Play - Consider which direction needs more clearance for your dominant hand
Equipment Integration - Plan space for projectors, launch monitors, and hitting mats
I initially planned for minimum dimensions and regretted it immediately. The extra two feet I added in my second build made an enormous difference in comfort and usability.
Integration with Existing Space
Consider how your enclosure will integrate with the existing space, particularly regarding access, storage, and multi-use requirements. Many home installations need to be easily removable or reconfigurable to maintain garage or basement functionality.
Think about sight lines from other areas of your home. A well-designed enclosure should look intentional and finished, not like a temporary structure that happened to land in your space.
Electrical requirements often get overlooked during planning. You'll need power for projectors, lighting, and potentially launch monitors or other equipment. Plan electrical access early to avoid unsightly extension cords or costly electrical work later.
Material Selection and Comparison
Choosing the right materials can make or break your enclosure project. I've tested everything from PVC pipe to steel framing, and the differences in performance, durability, and ease of construction are dramatic.
Frame Material Options
EMT conduit delivers a substantially more stable and durable frame than PVC pipe. This improved structural integrity makes EMT conduit the recommended choice for most DIY golf simulator enclosures, justifying the slightly higher material cost and need for specific cutting/deburring tools.
EMT Conduit: The Gold Standard
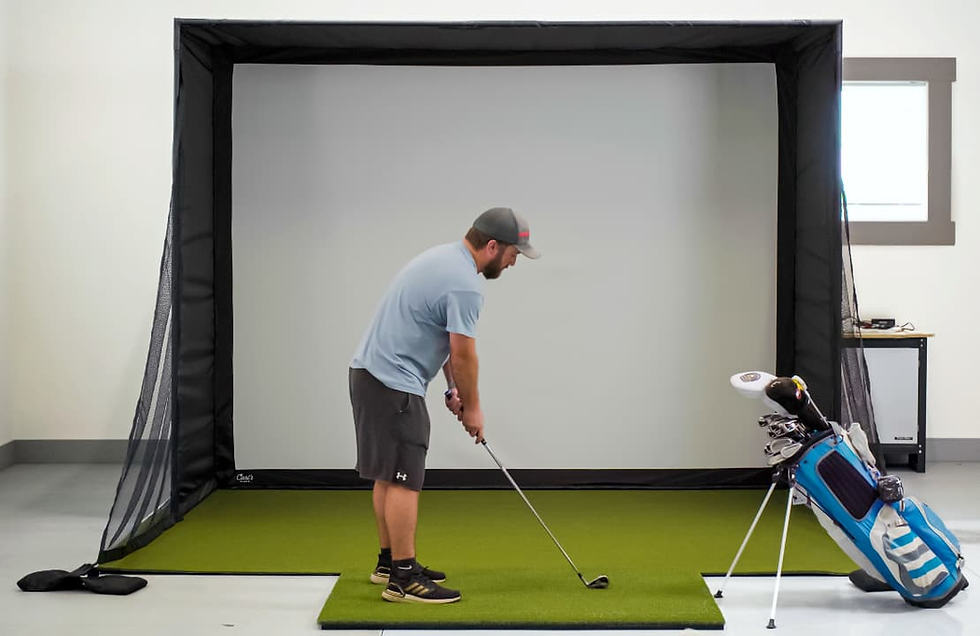
EMT (Electrical Metallic Tubing) conduit represents the best balance of strength, cost, and workability for most DIY builds. The build typically will consist of EMT Pipes and connectors (which are available at most hardware stores), an impact screen, heavy-duty curtains to act as the enclosure, and some bungees for fastening the screen to the EMT pipes.
The advantages of EMT conduit include superior strength and rigidity compared to PVC, professional appearance when properly finished, and wide availability of fittings and connectors. EMT also offers excellent value for the performance provided.
I switched to EMT after my PVC frame developed a noticeable flex during aggressive swings. The improvement in stability was immediately apparent, and the professional appearance was a welcome bonus.
PVC Pipe: Budget-Friendly Option
PVC pipe remains popular for budget builds due to its low cost and easy assembly without special tools. PVC pipes, conduit tubing, or metal framing can serve as the skeleton for your enclosure. However, PVC has limitations that become apparent with regular use.
The material tends to flex under load, which can affect fabric tension and create unwanted movement during swings. PVC also has a somewhat amateur appearance that's harder to disguise in finished spaces.
For temporary setups or extremely tight budgets, PVC can work adequately. However, most builders who start with PVC eventually upgrade to EMT conduit for improved performance and appearance.
Fabric Selection Guide
The fabric choice dramatically affects both the performance and appearance of your enclosure. You'll typically need different materials for different areas - impact zones require heavy-duty materials while side curtains can use lighter fabrics.
Heavy-Duty Nylon for Impact Areas
Carl's Place DIY enclosure surrounds your golf simulator setup with black nylon, a more cost-effective solution for home golf simulators. Heavy-duty nylon provides excellent durability and ball containment while maintaining reasonable cost.
Quality nylon fabrics resist tearing from ball impacts and maintain their shape over time. The material also cleans easily and doesn't fade significantly under projector light exposure.
Professional Knit Fabrics
The Pro Enclosure is made of black knit fabric which has a more professional look for luxury and commercial golf simulators. These premium materials offer superior appearance and performance but come at higher cost.
Professional fabrics typically provide better light absorption, improved acoustics, and more refined appearance. For dedicated simulator rooms or high-end installations, the investment is often worthwhile.
Top Enclosure Kit Recommendations
After testing various options and talking with other DIY builders, I've identified the best enclosure kits across different categories. These recommendations are based on real-world performance, not just marketing claims.
Best Complete Kit: Carl's Place DIY Golf Simulator Enclosure Kit

Price Range: $800-$1,400 depending on size
Material: High-quality nylon enclosure with impact screen
Sizes Available: Multiple configurations from 10'x10' to 16'x10'
Carl's Place DIY Golf Simulator Enclosure Kits are crafted to bring the feel of professional golf right into your home. Includes our impact screens that let the image go all the way to the floor, durable nylon enclosure, and the fittings to build your frame.
This kit impressed me with its comprehensive nature and attention to detail.
The included impact screen eliminates the need for separate screen purchase, and the quality of both the fabric and hardware exceeded my expectations.
The installation instructions are clear and well-illustrated, making the build process straightforward even for beginners. The fabric quality is excellent - heavy enough for durability but not so thick that it creates unwanted bulk.
Best Budget Option: Precision Sports DIY Enclosure Kit

Price Range: $500-$900
Material: Standard nylon with basic hardware
Sizes Available: Standard simulator dimensions
Our Golf Simulator Enclosure Kits are redesigned with an impact screen that perfectly brushes the floor. The high-quality nylon enclosure and connector fittings ensure a seamless setup.
For builders on tight budgets, this kit provides solid performance without premium pricing. The materials are adequate for recreational use, though not quite as refined as premium options.
I recommended this kit to a friend building his first simulator, and he's been satisfied with the results. The fabric has held up well to regular use, and the hardware has remained secure over several months of operation.
Best Premium Option: Professional Curved Enclosure Systems

Price Range: $1,500-$3,000
Material: Premium knit fabric with curved frame design
Sizes Available: Custom configurations available
For dedicated simulator rooms or commercial installations, curved enclosure systems provide the ultimate in performance and appearance. The curved design improves projection geometry and creates a more immersive experience.
These systems typically require professional installation or advanced DIY skills due to their complexity. However, the results rival commercial golf simulator facilities when properly executed.
Best DIY Component Approach: Individual Material Selection
Price Range: $300-$800 depending on choices
Material: Customer-selected fabrics and hardware
Flexibility: Complete customization possible
For experienced builders who want maximum control over their setup, sourcing components individually offers the best value and customization options. This approach requires more research and planning but can produce excellent results at lower cost.
I used this approach for my current setup, selecting premium EMT conduit, commercial-grade fabric, and professional hardware separately. The total cost was about 40% less than equivalent pre-packaged kits while delivering superior performance.
Step-by-Step Construction Process
Building a quality enclosure requires systematic approach and attention to detail. I've refined this process through multiple builds and can help you avoid the mistakes that cost me time and materials.
Pre-Construction Planning
Before cutting your first piece of conduit, create detailed plans including exact dimensions, material quantities, and assembly sequence. For a standard residential golf simulator, you'll need an enclosure measuring 12 feet wide by 16 feet deep by 10 feet high. Measure your space multiple times and account for any obstacles like ceiling fans, light fixtures, or HVAC equipment.
Create a cutting list for all materials and lay out your workspace efficiently. You'll need adequate space for measuring, cutting, and assembling frame components. Having everything organized before you start dramatically speeds the construction process. Your material list should include four pieces of 3/4-inch EMT conduit cut to 144 inches for the base width, four pieces cut to 192 inches for the base depth, and eight pieces cut to 120 inches for the vertical supports.
Frame Assembly Process
Start by cutting all frame components to exact length using proper tools for your chosen material. For EMT conduit, use a pipe cutter or hacksaw followed by deburring to remove sharp edges.
Cut two pieces to exactly 144 inches for the base frame width and two pieces to exactly 192 inches for the base frame depth. The vertical supports require eight pieces cut to precisely 120 inches each. Mark each vertical piece at the 60-inch point where cross-bracing will attach later.
Begin assembly with the base frame, ensuring it's perfectly square and level. The construction sequence follows a specific order that ensures structural integrity and proper alignment throughout the build process.
Base Rectangle Assembly

Layout the base frame on your level surface by positioning the 144-inch pieces parallel to each other, exactly 192 inches apart. Place the 192-inch pieces perpendicular to connect the ends, forming a complete rectangle.
Install 3/4-inch EMT 90-degree elbows at each corner, but do not fully tighten the set screws yet. Leave slight play for adjustment during the squaring process.
Square the base frame by measuring both diagonals, which should each measure approximately 240 inches. Adjust the frame position until both diagonal measurements are identical within 1/4 inch tolerance. Mark the ground at each corner for reference during vertical installation.
Secure all corner connections by applying medium-strength threadlocker to all set screws, then tighten each connection firmly. Double-check that the frame remains square after tightening all connections.
Vertical Support Installation
Insert the 120-inch vertical pieces into the top opening of each corner fitting. Use a level to ensure each post is perfectly plumb, and temporarily secure with clamps to prevent movement during the remaining installation.
For spans over 12 feet, install T-fittings at the center point of each 192-inch base piece. Insert additional 120-inch vertical posts into these mid-span fittings, creating support posts spaced 96 inches from each corner post.
Mark each vertical post at exactly 120 inches from the base, ensuring all posts are level and plumb. Apply threadlocker to all T-fitting set screws and tighten securely.

Top Frame Construction
Slide 90-degree EMT elbows onto the top of each corner post, aligning the openings to match the base frame orientation exactly.
Insert the 144-inch top frame pieces between the corner fittings along the width, then connect the 192-inch pieces to complete the top rectangle. Verify that the top frame dimensions match the base frame exactly.
Install T-fittings on top of any mid-span posts and connect them to the appropriate top frame pieces. Ensure the spacing matches the base frame layout perfectly.

Cross-Bracing Addition
Install horizontal cross-braces at the 60-inch marks on all vertical posts. Cut two pieces to 140 inches for width bracing and two pieces to 188 inches for depth bracing, making them slightly shorter than the frame dimensions to fit inside the structure. Use T-fittings or cross-fittings as needed to create secure connections. For additional stability, consider adding diagonal bracing by cutting pieces to connect opposite corners at the cross-brace level, which will require pieces approximately 156 inches long.
Take time to ensure each connection is secure and properly aligned. Poor assembly at this stage affects everything that follows, so verify all measurements and connections before proceeding to fabric installation.
Critical Connection Points
Pay special attention to joints that will experience high stress during use. Corner connections and impact screen mounting points need extra reinforcement to prevent failure under load. Install additional T-fittings every 24 inches along the impact screen mounting edge, and use 1/4-inch carriage bolts through the conduit for maximum security at these critical points.
I learned to use threadlocker on all bolted connections and ensure all set screws are properly tightened. A loose connection discovered during use can be dangerous and always seems to happen at the worst possible moment. Replace standard set screws with through-bolts where possible, particularly at corner joints and mid-span support connections.
Consider using pipe clamps or additional fittings at high-stress points for extra security. The small additional cost is worth the peace of mind and improved durability, especially for installations that will see heavy daily use.
Fabric Installation and Tensioning
Proper fabric installation determines both the appearance and performance of your finished enclosure. Achieving the right tension takes practice, but following proven techniques yields professional results.
Attachment Methods and Hardware
To attach the screen to your frame, use a combination of tarp clips, ball bungees, and tube clips. The key is to achieve proper tension on all sides, just enough to remove wrinkles but not so much that you get excessive ball bounce-back. Start with the impact screen, which should measure 12 feet wide by 10 feet high and include grommets spaced every 12 inches around the perimeter.
The attachment method you choose affects both ease of installation and long-term performance. Heavy-duty spring-loaded tarp clips provide secure attachment with easy adjustability, while 6-inch ball bungees offer consistent tension with some give for impact absorption. I've found that combining these methods works best, using tarp clips for primary attachment points and ball bungees for intermediate points that need slight flexibility.
Impact Screen Installation Process
Center the 12-foot by 10-foot impact screen on the impact wall, ensuring 6 inches of clearance on each side for proper attachment. Position the bottom edge approximately 6 inches above floor level.
Begin attachment at the center-top grommet using a heavy-duty tarp clip, then attach the center-bottom grommet with similar hardware. Next, attach the center-left and center-right grommets to establish the basic screen position.
Work outward from these center points toward the corners, spacing tarp clips at every grommet location (12-inch intervals). Maintain light tension initially, removing major wrinkles but avoiding over-tensioning that could damage the screen material.
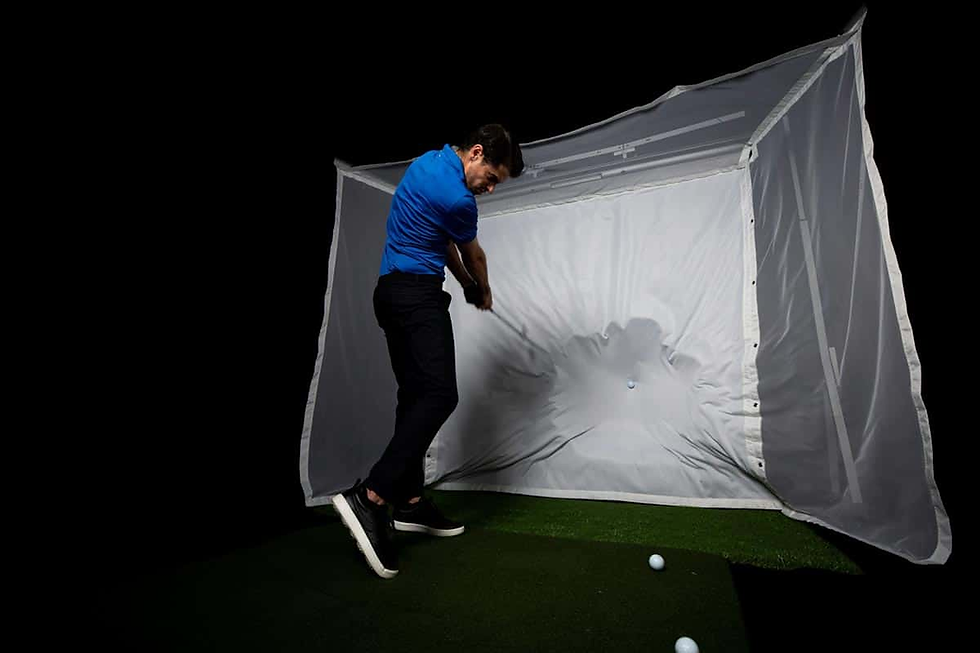
Fine-tune the tension by pressing the center of the screen, which should deflect 2 to 3 inches when pushed firmly. This amount of give ensures proper ball absorption while maintaining a smooth hitting surface.
For more instructions on how to build and install your own DIY Impact screen, follow this guide: Ultimate Guide To Diy Golf Simulator Impact Screen and Ultimate Guide to Building your own Diy Impact Screen Frame
Side Netting Installation
Cut the side netting to 16 feet long by 10 feet high for each side, allowing 6 inches extra length for overlap at corners. Begin attachment at the front corners and work systematically toward the back of the enclosure. Use the combination attachment method with tarp clips spaced every 18 inches and ball bungees placed between clips for consistent tension distribution.
Maintain proper tension by stretching ball bungees to approximately 150 percent of their relaxed length. The netting should feel firm when pressed but still have about 1 inch of give to absorb errant shots without creating excessive bounce-back toward the hitting area.
Tensioning Techniques
Start with loose attachment all around the perimeter, then gradually increase tension working systematically around the frame. Never fully tension one side before the others are attached, as this can distort the fabric and create stress concentrations that lead to premature failure.
The goal is to remove wrinkles and create a smooth surface without over-tensioning. Excessive tension reduces impact absorption and can lead to fabric failure or frame distortion. Follow this proven tensioning sequence for best results.
Attach fabric at all planned points with minimal tension, just enough to hold the material in position.
Begin tensioning at corners, working to remove major wrinkles while maintaining even distribution around the perimeter.
Work systematically along each side, maintaining even tension distribution and checking frequently that the screen remains properly centered.
Make final small adjustments to achieve optimal tension throughout, remembering that fabric will stretch slightly with initial use and may require minor adjustments after your first few practice sessions.
For more instructions on how to tension your Golf simulator impact screen, read our guide: Ultimate Guide to DIY Impact Screen Tensioning
Managing Fabric Overlap and Seams
Professional installations require careful attention to fabric overlaps and seam placement. Poorly managed seams create visual distractions and potential failure points during ball impacts. Plan seam locations to minimize visibility from the hitting position while ensuring adequate overlap for secure attachment.
I typically use 6 to 8 inch overlaps at seams for adequate strength without excessive bulk. Consider using fabric tape or other reinforcement at high-stress seams, particularly where the impact screen meets the side curtains. This area experiences significant forces during off-center hits and benefits from additional reinforcement to prevent separation or tearing over time.
Safety Features and Ball Containment
Safety should be your top priority throughout the design and construction process. Golf balls travel at high speeds and can cause serious injury or property damage if not properly contained.
Primary Containment Systems
Your enclosure must contain golf balls under all circumstances, including mishits and equipment malfunctions. This requires robust design with adequate safety margins rather than minimum containment.
The impact screen represents your primary containment, but don't rely on it exclusively. I always plan backup containment for areas where mishit balls might bypass the main screen.
Consider ball trajectory patterns for different club types and swing characteristics. Wedge shots create high arcs that can clear standard height screens, while driver shots travel at high speed and require robust impact absorption.
Emergency Considerations
Plan for emergency situations like fabric failure or frame damage during use. Your enclosure should fail safely without creating additional hazards, and you should have procedures for dealing with equipment failures.
Keep emergency contact information readily available and ensure other family members understand basic safety procedures around your simulator. A few minutes of safety planning can prevent serious accidents.
Child and Pet Safety
If children or pets have access to your simulator area, additional safety measures are essential. Consider locking mechanisms for equipment access and ensure all mounting hardware is properly secured and regularly inspected.
Install adequate lighting for safe movement around the enclosure, and keep the area free of tripping hazards like loose cables or equipment cases.
Lighting and Ventilation Considerations
Proper lighting and ventilation often get overlooked during enclosure planning, but they significantly affect your simulator experience and equipment longevity.
Optimal Lighting Design
Your enclosure needs sufficient lighting for safe movement and equipment operation while minimizing interference with projector image quality. This balance requires careful planning and potentially specialized lighting solutions.
Avoid lighting that creates glare on your impact screen or interferes with launch monitor operation. LED strip lighting around the perimeter often provides good general illumination without image interference.
Consider lighting zones that can be controlled independently: • Bright lighting for setup and maintenance activities • Dim ambient lighting for comfortable play • Emergency lighting for safety during power failures
Ventilation Requirements
Enclosed simulator spaces can become stuffy quickly, especially during intense practice sessions. Adequate ventilation improves comfort and prevents moisture buildup that can damage equipment.
Plan ventilation that doesn't interfere with ball flight or create unwanted air currents. Gentle air circulation is ideal - enough to maintain comfort without affecting ball trajectory.
Consider the heat output from projectors and other electronic equipment when planning ventilation capacity. Some projectors generate significant heat that must be managed to prevent overheating and equipment damage.
Troubleshooting Common Problems
Every builder encounters challenges during construction and use. I've dealt with most common problems and can help you identify and solve issues quickly.
Structural Issues
Frame flexibility or movement during use indicates inadequate structural design or loose connections. This problem gets worse over time and should be addressed immediately to prevent complete failure.
Check all connections systematically, tightening hardware as needed. If the problem persists, you may need additional bracing or stronger materials in critical areas.
Fabric sagging usually results from inadequate tension or fabric stretch over time. Minor sagging can often be corrected by retensioning, but significant sagging may require fabric replacement or frame modifications.
Fabric Problems
Wrinkles and uneven tension affect both appearance and performance. Small wrinkles can often be eliminated through careful retensioning, while persistent wrinkles may indicate frame geometry problems.
Fabric tears require immediate attention to prevent expansion and potential safety hazards: • Small tears can sometimes be repaired with appropriate patches • Large tears typically require fabric replacement • Stress tears around attachment points indicate inadequate reinforcement
Performance Issues
Poor ball containment often results from inadequate enclosure height or gaps in the fabric coverage. Review ball trajectory patterns and extend coverage as needed to ensure complete containment.
Excessive ball bounce-back from the impact screen usually indicates over-tensioning or inappropriate fabric selection. Reduce tension gradually until bounce-back reaches acceptable levels.
Maintenance and Upgrades
Regular maintenance extends enclosure life and maintains optimal performance. Establishing good maintenance habits from the beginning prevents most serious problems.
Routine Maintenance Schedule
Inspect your enclosure monthly for signs of wear, loose connections, or developing problems. Look for fabric stress around attachment points, hardware looseness, and any changes in frame geometry.
Clean fabric surfaces regularly to maintain appearance and prevent dirt buildup that can affect projector image quality:
Weekly Dusting - Use a soft brush or vacuum to remove loose dirt and debris
Monthly Deep Cleaning - Spot clean stains and marks with appropriate cleaners
Seasonal Inspection - Thorough examination of all components and connections
Keep maintenance records to track component wear and plan replacement schedules. This helps avoid unexpected failures during use.
Common Upgrade Paths
Most builders start with basic setups and upgrade components over time as needs change or budgets allow. Planning for common upgrades during initial construction saves time and money later.
Popular upgrade paths include: • Premium fabric replacement for improved appearance and performance • Upgraded hardware for easier adjustment and longer life • Additional features like specialty lighting or acoustic treatments
Consider modular design approaches that facilitate future upgrades without complete reconstruction. This flexibility proves valuable as your needs evolve.
Seasonal Adjustments
Temperature and humidity changes affect both frame materials and fabric tension. Plan for seasonal adjustments, particularly in unheated spaces like garages.
Metal frames expand and contract with temperature changes, potentially affecting fabric tension and joint alignment. Check and adjust as needed during seasonal temperature transitions.
Fabric materials also respond to humidity changes, requiring tension adjustments to maintain optimal performance throughout the year.
Budget Planning and Cost Optimization
Building a quality enclosure requires balancing performance requirements with budget constraints. Understanding where to invest and where to save helps maximize value.
Cost Breakdown Analysis
Typical DIY enclosure costs break down approximately as follows:
Frame Materials - 40-50% of total cost (EMT conduit, fittings, hardware)
Fabric Materials - 30-40% of total cost (impact screen, side curtains, ceiling)
Hardware and Accessories - 10-20% of total cost (clips, bungees, mounting hardware)
Tools and Supplies - 5-10% of total cost (cutting tools, assembly supplies)
Understanding this breakdown helps prioritize spending for maximum impact. Investing in quality frame materials pays dividends in long-term performance and durability.
Money-Saving Strategies
Buy materials in bulk when possible, particularly standard items like conduit and fittings. Many suppliers offer significant discounts for larger quantities that can offset the higher upfront cost.
Consider sourcing materials from multiple suppliers to find the best prices on each component. Industrial suppliers often have better prices than home improvement stores for specialized items.
Time your purchases around sales and clearances, particularly for fabric materials where color and pattern flexibility exists.
Value Engineering Approach
Focus spending on components that directly affect performance and safety while economizing on items that have minimal impact on functionality. Premium fabric in the impact zone is worth the investment, while side curtains can use more economical materials.
Invest in quality tools if you plan multiple projects or anticipate future modifications. Good tools make construction easier and produce better results than cheap alternatives.
Consider the total cost of ownership including maintenance and potential upgrades when making material decisions. Higher upfront investment often produces lower long-term costs.
Advanced Customization Options
Once you've mastered basic enclosure construction, advanced customization options can significantly enhance your simulator experience and create truly personalized setups.
Curved Enclosure Designs
Curved enclosures provide superior projection geometry and create more immersive experiences compared to flat installations. The curved design eliminates corner distortion and provides more uniform viewing angles throughout the hitting area.
Building curved enclosures requires advanced planning and custom fabrication techniques. The frame must be precisely shaped to create smooth curves without flat spots or irregularities that would affect projection quality.
I attempted a curved build for my third enclosure and found the complexity significantly higher than anticipated. The results were excellent, but the construction time and skill requirements were substantially greater than flat designs.
Multi-Zone Enclosures
Advanced builders sometimes create multi-zone enclosures that can accommodate different activities or multiple users simultaneously. This might include separate hitting areas for different skill levels or dedicated spaces for putting practice.
Multi-zone designs require careful planning to ensure adequate separation and safety between areas. Sound isolation and lighting control become more complex with multiple activity zones.
Acoustic Treatments
Adding acoustic treatments to your enclosure can dramatically improve the simulator experience by reducing echo and creating more realistic sound environments. This is particularly valuable in hard-surfaced spaces like garages or basements.
Acoustic foam panels can be integrated into the fabric design or added as separate components. Focus acoustic treatment on areas where sound reflection is most problematic - typically hard walls behind and beside the hitting area.
Consider both sound absorption to reduce echo and sound blocking to prevent noise transmission to other areas of your home. These requirements sometimes conflict and require balanced solutions.
Integration with Smart Home Systems
Modern enclosures can integrate with smart home systems for automated lighting control, climate management, and even automated fabric adjustment systems. These features add convenience and can improve the overall simulator experience.
Automated lighting systems can provide preset configurations for different activities - bright lighting for setup and maintenance, optimized lighting for play, and safety lighting for movement around the enclosure.
Climate control integration helps maintain optimal temperature and humidity for both comfort and equipment protection. This is particularly valuable in spaces that aren't otherwise climate controlled.
Conclusion
Building a DIY golf simulator enclosure has been one of my most challenging yet rewarding home projects. The journey from my first failed attempt with bed sheets and PVC pipe to my current professional-grade EMT enclosure taught me valuable lessons about planning, material selection, and construction techniques.
Key Success Factors
The most important lessons I've learned through multiple builds center around a few critical areas:
• Material Quality Matters - Investing in proper EMT conduit and quality fabric produces dramatically better results than budget alternatives
• Planning Prevents Problems - Thorough planning and precise measurements eliminate most construction challenges and safety issues
• Safety First - Proper ball containment and structural integrity should never be compromised for cost savings
• Build for the Future - Designing with upgrades and modifications in mind saves money and effort long-term
Remember that your enclosure is a long-term investment that affects every aspect of your simulator experience. Taking time to build it properly pays dividends for years of enjoyable practice and improvement.
If You Liked This Article, feel free to check out our other ones: - Ultimate Guide To Building Your Own DIY Golf Simulator


Comments